Friday, March 28, 2014

Origami Animal Embroidery Patterns


I don't know what it is, but I've been really into "origami" style embroidery patterns lately. Confession: I was WAY too good at geometry when I was in school. I think I got 106% in that class (yeah, I did extra credit when I already had 100%--NERD). I sketched up some patterns from origami animal photos (you can find about any animal you want when searching images online--just sketch the fold lines to make it 2 dimensional). I modified them slightly, mostly leaving out any very tiny "fold" lines that I felt would detract from a final embroidered project.


I really liked this squirrel, so I made it into a wall hanging by gluing the embroidered fabric to the hoop once I was finished stitching and covering the back with a piece of trimmed card stock so you can't see the stitches from the back anymore. To cover the back, just trace around the embroidery hoop onto card stock and cut out the circle just inside the traced lines. I tied a piece of ribbon at the top and voila! Now I can hang it on my wall and smile at his geometric squirreliness.

Feel free to snag the .jpg of the squirrel pattern here and resize it to your needs, or you can download the .pdf of all 4 patterns I made here (it's free).


If embroidery isn't quite your style, I found these necklaces on Etsy! I got the squirrel (of course!).


Thursday, March 27, 2014

Ricotta Silver Dollar Pancakes


The hus and I have been in a "food rut" lately. So I went through some of my cookbooks to get a little inspiration on some new meals. I'm one of those people that sometimes buys a pretty looking cookbook and then rarely, if ever, opens it (for shame!). This recipe is in The Newlywed Cookbook. I got a copy of this for myself as well as for my sister as a wedding gift. The texture of these pancakes is AMAZING, and it is well worth the extra effort they take (like separating the eggs and folding in whites!) but that's the stuff we do for the ones we love, right?

To make these yourself you will need:

1 1/3 c. flour
1/2 c. cornmeal
1/2 tsp salt
1/2 tsp baking powder
1/2 tsp. baking soda
1/4 tsp. nutmeg
1/4 tsp cinnamon
1 Tbsp sugar

zest of one lemon
2 c. buttermilk*
1/2 c whole milk ricotta cheese
2 eggs, separated

cast iron skillet
Butter for greasing skillet

*If you don't have buttermilk on hand, add 2 teaspoons of lemon juice or vinegar to regular milk and let it sit a couple minutes. This will add the acidity the recipe requires to activate your leavening agents.

Start by mixing all of the dry ingredients together in a large bowl and setting them aside. Then mix together all of your wet ingredients in another bowl (except for the egg whites). Add the wet ingredients into the bowl of dry and mix together, set aside while you beat your egg whites to stiff peaks in a third bowl (so many bowls!).

Then, gently fold in the egg whites to the rest of your batter and you will get a nice light fluffy batter.

Heat a cast iron skillet to medium heat and butter the bottom once heated. Pour batter into the pan; I use a 1/4 cup measure to pour my batter for these silver dollar style pancakes, but you could make these any size you want. You can also use a pancake griddle if you like, but I love breaking out my cast iron at every opportunity.


These cook about 1-2 minutes on each side. Once poured, you will know it's time to flip when tiny bubbles form on the top of the batter. The second side is done once the sides of your pancake appear dry and you can see a little golden brown color around the bottom edges.


Serve these scrumptious little pancake bites with fruit, syrup, whipped cream or any other topping your heart desires. They are light and fluffy but have a tiny bit of crispiness from the cornmeal. I think these are a new favorite with us!

Do you have any recipes I should try? Leave me a link or recipe in the comments (moderation is enabled, comments will not appear until approved).


Tuesday, March 25, 2014

7 Great Crafts for Spring


Spring is finally here (even though it doesn't quite feel like it everywhere). Get yourself in the spirit either way by making some of these cute Spring crafts. :)


Make some paper flowers. No matter what flower is your fave, you can find a paper variety to whip up on a weekend.


If gardening is your thing, these fabric covered flower pots are sure to brighten up your space. I love them as part of my tiny windowsill garden.


I saw these adorable bees over on The Experimental Home. Use your leftover plastic Easter eggs to whip up a hive full of them :)


These dinosaur garden markers were one of my favorite garden projects ever. They add whimsy and color to your garden while you are waiting for everything to sprout!


April showers bring May flowers, so you might as well join in the fun with a rain cloud brooch. If storms are more your style change it up with a cloud + lightning brooch instead.


Don't forget to brighten up your office with some candy colored binder clips. Some clips, glue and scraps of paper or fabric are all you need!

Take a few minutes and make some bright Spring stationery! These cards are super easy and will brighten anyone's day when they open the mail.

What are your favorite Spring crafts?


Friday, March 21, 2014

How to Embellish Fabrics with Embroidery


I have quite a bit of fabric in my stash, I just can't pass up a good deal. Sometimes I just don't feel inspired by the fabrics I have when it's time to make a project. I have found that I can jazz up the stuff I have (or have had for a loooooong time) by adding some embroidery to the patterns.


I like patterns like this one with small leaves, because it is easy to add in some extra interest with a new color, by using satin stitch to fill in small areas. This is also a great way to create color combos you love without looking tirelessly for fabrics containing both colors. Love the gray and yellow color combo? Find fabrics done with only gray tones and stitch in some yellow!


This method is also great because you can decide how much of your stitched color you want to add. I like just adding a little red here and there with this teal fabric, but you could go nuts and fill in all of the outlined leaves if you want to.


I also love adding texture to fabrics with embroidery. This red fabric with multi-colored polka dots is already super busy, so I found a floss color that matches the yellow and added in some french knots to give it more dimension.


You can make french knots in a couple different sizes to add more texture, and since this fabric has so many colors you can do a few dots of each color if you want, or just pick out a few dots of the same color (like I did with the yellow). This is also a great little project you can take with you just about anywhere (and it's fun to use some fabrics from your stash without actually USING the fabrics from your stash). It might even inspire you to make some small projects with your cute new embellished fabrics!

Do you have any ways you like to freshen up your fabrics? I'd love to hear about them in the comments :)


Wednesday, March 19, 2014

Peanut Butter Pie


I'm a teeny bit obsessed with peanut butter pie at the moment. It started when we grabbed some for dessert at one of our favorite restaurants a couple weeks ago. Since then I have been scouring the interwebs for recipes, below you will find my fave which is a mish mash of a couple recipes I have found and enjoyed!

For Crust:
8 ounces chocolate cookies
4 tablespoons butter, melted

For Filling:
1 cup heavy cream
8 ounces cream cheese (I used 1/3 fat cream cheese, because the heavy whipping cream makes me feel guilty)
1 cup creamy-style peanut butter
1 cup powdered sugar
1 – 14 ounce can sweetened condensed milk
1 teaspoon vanilla extract
1 teaspoon freshly squeezed lemon juice


First, add the cookies to the bowl of a food processor and pulse into fine crumbs (I used dark chocolate Fudge Stripe cookies-yum!). Combine melted butter and cookie crumbs in a small bowl, and stir with a fork to mix well. Press mixture into the bottom and up the sides of a 9-inch pie pan. I decided I wanted to make 3 smaller dishes of this pie, so I distributed my crust evenly between 3 ramekins about 5 inches in diameter. I still had plenty of filling for all three!

Next, pour the heavy cream into a bowl and beat using a stand mixer or hand mixer until stiff peaks form. I put my bowl in the refrigerator as I find this helps speed up the process a little bit. Store in refrigerator until ready to use. Place the cream cheese and peanut butter in a deep bowl, beat on medium speed until light and fluffy. Reduce speed to low and gradually beat in the confectioner’s sugar. Add the sweetened condensed milk, vanilla extract and lemon juice. Increase speed to medium and beat until all the ingredients are combined and filling is smooth.

4) Stir in 1/3 of the whipped cream into the filling mixture (helps lighten the batter, making it easier to fold in the remaining whipped cream). Fold in the remaining whipped cream. Pour the filling into the prepared pie pan. Top with a drizzle of melted chocolate on top (or if you are like me put more cookie crumbs or pieces of these cupcakes leftover from Husband's birthday on top), and refrigerate for three hours or overnight before serving.


Monday, March 17, 2014

Etsy Crush: Spring Fever

I don't know about you, but I am having some major Spring Fever lately! Last week here in Portland we got a little taste of Spring (it's supposed to cool down and bit and rain more the next couple weeks now, boo!). My super Spring Fever got me searching through Etsy to find some great handmade Spring time items; I have a crush on all of these:


Seeds from SmartSeeds to start your garden this Spring. I ordered the scarlet milkweed pictured above along with some cute French mini melons and Hungarian sweet peppers. I can't wait for my container garden this summer!


This super cute camper birdhouse from birdhouse20. I don't have a yard or any kind of space to put a birdhouse at the moment (I use all my balcony space for container gardening), but I really love the look of these birdhouses.


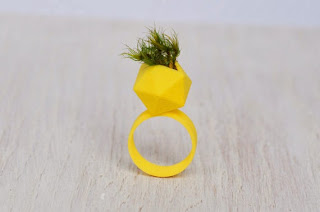
These planter rings from wearableplanter come in bright Spring colors and can house a tiny plant (they come with moss). Super cute!


Finally, these awesome glass terrariums from Glimpse Glass are right up my alley. I have a TON on hen and chicks from a plant I propagated last September, as well as some air plants I have purchased. I think a cute little hanging home would be perfect for some of them (and my window sill is getting really cluttered!).

Have you seen any great Spring items on etsy or a favorite blog? Leave me a comment to share, I'd love to take a peek!