Monday, June 27, 2011

My First Signs of Summer

As I have mentioned before, the husband and I have decided to challenge our normally black thumb's this year and started an indoor garden. I'm excited to say, it doesn't appear I have killed anything yet, and were it not for our weather only warming up today, I feel many of the things I started from seeds would be much further along now than they are. I bought my tomato starts at the farmer's market, mostly because I really love tomatoes and I wanted to make sure they were started on the right track. This picture shows the first of my little Sun Gold tomatoes starting top turn orange! Yum! I can't wait to throw these onto salads and bruschetta!

Speaking of salad, here is some of our Little Gem lettuce. I have to say, if you are a novice gardener like myself I would highly recommend starting out with lettuces. All of mine sprouted quickly and have been doing just great. One of my co-workers is from Hawaii and has even given me some seeds for a Hawaiian lettuce variety, I believe Manoa. Once it is bigger, I'll be sharing that with you as well, I'm pretty impressed with myself to be making all of this grow. We even have some yummy basil getting bigger by the minute.

To really Impress you all, I may take a photo of the whole garden in front of out window. Our tomato plants are freakishly huge, the Sweet 100's are about 8 feet tall. Had I known they would get that large, I wouldn't have done tomatoes, my poor little apartment barely has room for me to move anymore.

Are any of you gardening? Are you lucky enough to have something outdoors or are you limited to indoor containers like me? I'd love to hear what kind of things you are growing and if they are having much luck this year.


Asiatic Lily Mix Sale - Save 80%


Friday, June 24, 2011

Friday Food Craft: Strawberry Peach Cobbler


It must be summer, the farmer's market is finally starting to have yummy berries for me to turn into things like this! This cobbler recipe was an experiment of sorts, and again a hodgepodge of various recipes I have sitting around. Peaches and strawberries make quite the nice combo with a not too sweet crust. Yum! You can make a delicious Strawberry Peach Cobbler of your very own!


You will need:
3 ripe peaches, peeled and cut into thick slices
1 pint ripe strawberries
1/2 teaspoon vanilla
3/4 cup plus 1 Tablespoon Sugar
1 1/2 cups flour
1 Tablespoon baking powder
1/2 tsp salt
1/3 cup chilled butter, cut into cubes
1/4 cup milk
1 egg
1/2 teaspoon cinnamon (optional)
1/2 teaspoon nutmeg (optional)


Preheat your oven to 400 degrees and grease a baking dish (I used butter). After peeling and slicing your peaches, toss them with 1/4 cup of your sugar and 1/2 teaspoon of vanilla. Place them into your dish to bake for about 20 minutes, or until the peaches are tender and the sugar starts to caramelize.

Remove from oven and add your strawberries(washed and sliced if needed, I used Hood strawberries which are quite small) and another 1/4 cup of sugar. Place into the oven another 5 minutes while you prepare your cobbler topping.


To make your topping sift together your flour, salt, the last 1/4 cup of sugar and baking powder (plus cinnamon and nutmeg if you choose) and cut in your cold butter until the texture is close to coarse sand. Beat together your egg and milk and then add into the flour mixture. Spoon over the top of your fruit. Use your final Tablespoon of sugar to sprinkle evenly over the top of the crust.

Return to the oven and bake 15 to 20 minutes, until the crust is golden. Allow to cool at least 30 minutes before eating, fruit juices will be extremely hot fresh from the oven. Serve with whipped cream or a scoop of ice cream. Enjoy!

*If you happen to have a lemon laying around the house (which I did not) It would perk this up a bit to add the juice and zest of half a lemon in with the fruit, but It is yummy without it as well.


Wednesday, June 22, 2011

Painted Tiles: Space Invaders Coasters

In yet another installment of "crafts for guys" I made these Space Invaders coasters for my husband using the same technique of tile painting I used for these. The husband and I are total video game nerds, but I don't think anyone would turn these little guys away. The straight lines of 8 bit video game graphics really help give this project more ease if you aren't so handy with an Xacto knife, as a ruler can be used as a guide if needed. I personally like being able to tell my projects are handmade, so when a line isn't perfect, I don't freak out. As I didn't really give clear instruction in the other post here goes:

You will need:

A ceramic tile (or tiles) from the hardware store
Enamel paints
an image you like
contact paper
an X acto knife

*If your image doesn't fit on your tile, you can always crop it any way you like or use a copy machine to change the size to fit.

To start, I clean my tile with rubbing alcohol and then cover it with contact paper (any color will do), make sure to smooth out any bubbles.

Next, I placed my image onto the contact paper and taped it into place.

Then, using an Xacto knife, I cut around my image pressing firmly so I would cut through both my paper and the contact paper.

Remove your image from on top of the contact paper and then carefully remove the area of the contact paper you will be filling in with paint. I used the tip of my blade to help pull up a corner of the contact paper so it could easily be peeled. Peel slowly so that if needed you can redo any cuts that didn't go all the way through without distorting your image.

I then re-cleaned the exposed areas of my tile with rubbing alcohol and dryed it before applying my paint.

If only applying one coat of paint, I try to remove my contact paper guide while it is still wet to avoid messing up the paint edges. If I use more than one coat, I will score around the edges of my design again with my Xacto blade to prevent rough edges or paint peeling off with the contact paper.

Then, depending on your type of enamel paint, bake as directed to set your design permanently.

To make the coasters I used a sheet of craft foam, cut to size and glued onto the back to protect my tabletops from the rough tile back. You could, also frame these to use as wall art, simply add a hook to the back, use as a regular tile, place them into concrete pavers, etc.


www.DickBlick.com - Online Art Supplies

Painted Tiles: Alice in Wonderland

First I'm using paint chips, now I'm using tiles. I really never shut off my brain, so when I was wondering through the hardware store, naturally I thought I could find some awesome crafty finds. I really enjoy using my enamel paints, so I'm always looking for new ways to incorporate them into projects, and until I moseyed on down the tile aisle it had never crossed my mind. These tiles are a steal at 16 cents a piece, and come in a white and off white color.

"What are you going to do with a bunch of painted tiles?"

Well, obviously, you could still use it to tile something if you wanted. This little Alice in Wonderland would be great in a series of tiles, and you could definitely use it to tile a border in a child's room, or if you didn't already have the best playhouse ever, you quickly could. You could also attach a hook to the back with some epoxy and use it as wall art, or even frame it. Have a friend that really likes tea? Make some more Mad Hatter/Tea Party themed tiles and glue either cork or foam to the back and voila! Coasters.

My image is Alice falling down the rabbit hole. I made it by placing contact paper on my tile, cutting out the silhouette with an Xacto knife and applying my paint first in one direction (Left to Right) and then the other (up and down). I let it dry in between coats to get full coverage. I forgot to go back with my Xacto knife and score the paint around the edges of my silhouette, so when I pulled off the contact paper, it removed some of the paint on one edge, leaving a rough edge. I actually think this looks better since she is "falling through space" so I didn't go back and touch up the edges. If you decide to try out using contact paper or other stencils, I would recommend either removing the paper while the paint is still wet to avoid this issue, or going back after the paint is dry and cutting around the edges again with your knife.

Then, do as you see fit with your tile. I will be posting another project I made for my husband with this method shortly. It can definitely fit any theme, and you don't need to be able to draw if you just use silhouettes that you can print out and fit onto a tile to trace around.


Friday, June 17, 2011

Friday Food Craft: Pistachio Fudge

It's an easy sweet treat this week for the Friday Food Craft. This recipe can actually be switched up to become almost any flavor you would like. It's a great fudge recipe because it doesn't require any candy thermometer and hassle. Just a few easy ingredients and about 15 minutes of your time and you can have delicious fudge. Also, you can leave out the artificial food coloring if you like.


You will need:

A small baking dish (I used a pyrex dish that is roughly 9" x7", and 8"x 8" baking dish would also work, or double the recipe and use a 9" x 13" cake pan)

1/3 cup plus 1 Tablespoon evaporated milk
1/4 cup butter (half a stick)
1 1/4 cups sugar
1/2 cup pistachios, shelled and chopped
1/2 teaspoon vanilla flavoring
4 ounces white chocolate chips
1 cup marshmallow creme
1-3 drops green food coloring
1 pinch salt

This fudge comes together very quickly, so you will want to have a helper to stir while you add all of your ingredients, or make sure you have everything measured out before you begin and close at hand. Also, make you sure you have greased your baking dish ahead of time.

In a large saucepan, heat the evaporated milk, sugar and butter until bubbling, then continue to cook for 4 minutes while stirring continuously.

Remove from heat and add your white chocolate chips, marshmallow creme, vanilla, salt, pistachios and food coloring. You may add more or less green coloring depending how green you want your fudge. Fill your prepared baking dish, smooth out the top and let cool. You may add extra pistachios on top if you wish.

Enjoy!

This recipe is really easy, and to change your flavors just substitute out what type of nuts (if any) and the flavor of chocolate chips you use instead of white chocolate chips (I have used soft peppermint sticks around the holidays to make a great peppermint fudge, you could also use butterscotch, peanut butter chips, mint and dark chocolate).


Wednesday, June 15, 2011

Paint Chip Gift Tags

I'm always looking for clever crafts, that can be done easily and inexpensively. These paint chip gift tags fit the bill perfectly. So many companies are making bigger paint chips now that you can use them for quite a bit without people even realizing it is a paint chip sample! The best part: the cost! I happened to have a bunch of paint chips laying around from several painting projects, but if you don't just go to a local hardware or paint supply store and select the colors you wish to use, they are free* (I recommend asking if you may take some if you do not plan on buying any paint). If you fall in love with a color, there are often small sample size paints you can buy for a larger project as well (I recently found a recipe online to mix your own chalkboard paint-- once I finish my project I'll be sharing that with you as well!).

So, back to the gift tags. I used various colors of paint chips, got a fancy hole punch, some white ribbon, and a regular hole punch and what you see here is the result. Just punch out your fancy shape, in my case a leafless tree, from your top paint chip, and overlay it onto a contrasting color chip. Then using a regular hole punch, punch a hole through both paint chips, insert your ribbon and you have a cute little gift tag. These also double as great bookmarks, and you can make them as large as your paint sample chips allow. It is your choice if you want to make them recognizable as paint chips, or do as I have here and just let it look like fancy colored paper (I love paint chips because they are very close in quality to Color Aid, a super expensive item you might be familiar with if you ever took a color theory class in art school--and I have, ouch!).

Another great thing about this project, is that there is little to no waste. I am saving all of my little punch out trees as confetti. These would be adorable at an Autumnal Equinox party later in the year! These hole punches come in a huge variety of shapes, also, so you could easily find one to fit your occasion and I have seen them on sale at almost any time of year at various paper and craft stores around town, as well as online.

More fun crafts are on the way, so check back again soon!


www.DickBlick.com - Online Art Supplies


Monday, June 13, 2011

Yarn Bombing!


This picture was taken by one of my BFFs, Amanda, at a yarn bombing effort in Atlanta, GA. Her contribution is the pink stripey block on the bench you see here. I have seen some really awesome yarn bombing stuff online lately, including people who have covered entire vehicles and statues, and I find myself rather jealous that as crafty as I am, I can not knit or crochet all that well, so don't get to participate in fun little events like this.

Most recently, I saw an entire row of bike stands here in Portland covered in their own colorful yarn cozies! Have you seen or participated in any yarn bombing in your city/town? Do you do some other craft that you share with the world? Sidewalk chalk art? Small postcard or business card art left on pin boards? I just started a Flickr group where you can post your favorite public art and craft photos here.

Friday, June 10, 2011

Friday Food Craft: Go-To Granola

Article first published as Easy Granola Recipe on Blogcritics.

So, as I am sure you will notice, I published this recipe first on blogcritics.com. They contacted me earlier this week asking if I would like to be a food contributor, and how can I resist sharing my recipes with even more people? So from time to time I will be publishing articles there before they show up on Craftinomicon. If waiting until Friday for your food craft fix proves too hard, you can now check there and see if I have published anything early.


If you're like me, you are always looking for snacks that are easy to take with you on the go, but aren't going to totally trash your diet. This recipe fits the bill, an easy granola that you can whip up in 30 minutes, and change from time to time by switching out various ingredients so you don't get bored.

The ingredients are easy to find:

Old Fashioned Rolled Oats (4 cups)
Raw Sliced Almonds (1/2 cup)
Raw Sunflower Kernels (1/4 cup)
Unsweetened coconut (shredded or flakes) (1/2 cup)
Maple Syrup (1/2 cup)
Canola Oil (2 Tablespoons)
Cinnamon (1/2 teaspoon)
Nutmeg (1/2 teaspoon)
Salt (1/2 teaspoon)
Dried fruit (1/2 cup) I have used dried cranberries, raisins, figs and dates, but any dried fruit will do.

All measurements may be approximated to use what you have on hand, and you may certainly substitute different nuts for the almonds and sunflower kernels if you like. Also, if maple syrup isn't your favorite, try a local honey instead.

All you need to do is mix together all the ingredients, except the dried fruit, on a baking sheet (I prefer one with sides so I don't spill my granola everywhere) and place it in a 350 degree oven for 30 minutes. Halfway through baking, stir your granola to make sure baking occurs evenly.

Once you take it out of the oven, stir in your dried fruits and place it into an air tight container. I have been known to place mine into several smaller mason jars (approximately 4 ounce jars) so that I can easily grab one at a time and not have to measure into bags later.

This granola will keep for up to 3 weeks in the air tight containers.


Tuesday, June 7, 2011

Dry Erase Message Board

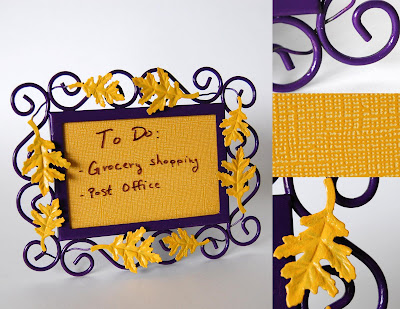
I was doing some Spring/Summer cleaning this morning and happened upon a picture frame that really wasn't be utilized as best it could (shoved in a box somewhere). My solution: turn it into something useful.

This is a 3" x 5" frame, so it fits perfectly on a desktop without taking too much room. For this reason I thought it would make a great dry erase marker board. To make one of your very own, all you need is some colorful paper or fabric, an old frame of any size (that has a glass insert covering the picture area) and a dry erase marker or Sharpie Peel-Off China Markers (you could use permanent markers if you don't mind having to wipe your messages off with alcohol and some elbow grease).

Cut your paper or fabric to the desired size and place it into your frame instead of a photo. If you like, you can embellish your frame with some paint. I felt like making mine purple and yellow, but it would have also been fun to do the whole thing hot pink. I used some enamel paints I had that can be used on metal and ceramic, but you could find some spray paint for metal as well (which would probably have been easier). The great thing about these is that you can easily switch out the paper inside to change with your decor or mood. If you have lots of fancy gift wrap sitting around, this is a great way to use some as well.

You could also get a mirror that fits your frame if you don't like the paper insert idea (or if your frame doesn't have a glass insert), and use that as your message writing surface.


This entry contains an affiliate link. If you decide to purchase an item through this link, I may benefit through a commission.

Saturday, June 4, 2011

Shop updates!

Hey everyone! I just got some more of my Rainy Day fabric from Spoonflower in the mail today, and I wanted to let you all know that my April Showers Bring May Flowers coasters have been added to my shop. So, if you didn't win the May Giveaway Day contest, and just have to have some of these for your very own, they may now be obtained! I am also working on some new Patchy Derm the Pachyderm stuffed toys that should be up by next week.


I hope you are all having a great weekend, the sun has finally come out this weekend in Portland and we are scheduled to have our very first 80+ degree day today! I'm sure I will fit some crafting into the sunshine and relaxing. :D


I am way behind on some projects I started months ago (for shame!, I know) but I am hoping to get lots done this next week so stay tuned for some exciting new projects.

Friday, June 3, 2011

Friday Food Craft: Mint Brownies

If you are like me, there is never a bad time for a chocolate fix, and these brownies definitely satisfy a chocolate craving! Perfect with a tall glass of milk, these are rich, chocolatey, minty and delicious. If you don't have the inclination to make brownies from scratch, you could easily substitute your favorite boxed variety, but I guarantee you your effort will be rewarded (as will your patience, you really do need to let these cool before you add your minty topping and final chocolate layer).

You will need:

1 9" x 13" pan. I used a glass baking dish, your baking times may differ if you use metal or coated pans.

For the Brownies:

1 1/2 cups flour
2 cups granulated sugar
1/2 cup plus 2 Tablespoons cocoa powder
2 teaspoons vanilla
1 teaspoon salt
1 cup vegetable oil
4 eggs
1 cup nuts (optional)

For the Mint layer:

1 stick of butter, at room temperature
2 cups powdered sugar
1 Tablespoon water
1/2 teaspoon mint extract
3 drops green food coloring

Chocolate topping:
1 cup chocolate chips
6 tablespoons butter

Start by making your brownies. Preheat your oven to 350 degrees. Place your dry ingredients into the bowl of a stand mixer and gently mix them on lowest speed until well combined. Add in your wet ingredients and mix until combined, try to get rid of any lumps but do not over mix your batter.

Place the batter into your 9" x 13" baking dish (I lightly spray mine with cooking spray just to be safe, but there is enough oil in these that they rarely stick). Bake at 350 degrees for about 30 minutes (time may vary depending on type of pan you use and your elevation). Allow your brownies to cool before topping with the next layer.

To make your mint layer, which is really a minty butter cream of sorts, start by placing your butter into the bowl of a stand mixer and beating it by itself until smooth. Add in your powdered sugar, water, mint extract and food coloring and beat together until it reaches a nice smooth consistency. Spread evenly over your brownies and chill in the refrigerator while you make your final chocolate layer.

In a microwave safe bowl, heat your chocolate chips and 6 Tablespoons butter in the microwave at 20 second intervals, stirring between each. It usually takes about 1 minute for me to melt these together and stir them into one smooth mixture. Spread this evenly on top of your mint layer, and place back into the refrigerator to set.

These may be kept covered at room temperature once the chocolate layer has set. I recommend cutting them into smaller squares as they are quite rich.

Thursday, June 2, 2011

Recycled Paper Beads

Here is what I have been working on this morning, some paper beads made from magazine pages. I think Earth Day/ Earth Week might be happening this week for me, as I am totally into the recycled paper projects right now. These beads are great because, you can make them in any color, they are cheap (especially if you are using magazines/newspapers rather than a craft paper)and they can be made in any size to fit any project. You could even use scraps of gift wrap, as thin pliable paper really lends itself well to being wrapped in a cylinder.

I just cut strips of paper from my magazine (you don't realize how many fun beads you can get out of a magazine until you look, either). I find the ads to be especially useful, great backgrounds, lots of textures and gradients, and I generally don't care about any of the ads in my magazines anyway, so I can make this project without actually ruining any of the articles inside!

I wrapped my paper strips around the bottom of a crochet hook, though you could use any cylindrical object you like, and any size depending how big you want the holes in your beads to be. I used a little bit of paper Mod Podge, glossy finish, to glue my beads together. Just roll your paper up on your tool of choice (chopsticks work great--just pick up an extra set the next time you go out for cheap takeout!) and then coat the entire outside of your bead with the Mod Podge to seal it. You can use a matte finish if you prefer as well, I happened to have glossy finish on hand, and I like my beads to have a little extra shine. The whole project took about 30 minutes and now I have my own supply of one of a kind paper beads to use as I see fit!

Wednesday, June 1, 2011

Paper Twine

So, I stumbled on this tutorial the other day and felt inspired. I don't happen to have a spindle, or any yarn making experience but I thought I might want to try making some decorative twine out of an old magazine I had sitting around. What you see here is the result.

I made a little card to wrap my twine around out of a cereal box. You really do need something to wrap around as you go, or the paper has trouble holding together. I think this would be great to wrap around a gift instead of ribbon, and is a nice way to re-use an item many of us read through once and then get rid of (though truth be told, I'm horrible about keeping magazines around forever).

I'm going to try to come up with a few other things to do with old magazines and newspapers, maybe even some paper mache projects are going to happen. I've seen some pretty great paper mache going on in the craft world lately.


Do you have any great projects using newspapers and magazines? I'm currently trying to make some beads, details to come.